
An Introduction to Hyvä Admin Grids
This article will familiarize you with Hyvä Admin Grids and answer the following questions:
- What are Hyvä Admin Grids?
- What can Hyvä Admin do for me?
- How do I create a grid with Hyvä Admin?
Along the way, we will look at the underlying ideas and principles, so you can start applying them immediately with your next admin HTML grid.
What are Hyvä Admin Grids
First, let me clear up the most common misunderstanding: Hyvä Admin is not a replacement for the existing Magento Admin UI! It is a library to make building admin grids fast, easy and fun.
The motivation for the module came from long-term dissatisfaction with Magento's built-in UI component system.
Using Hyvä_Admin is free and does not require a commercial license.
What is the purpose?
The guiding idea behind Hyvä Admin Grids is to enable the rendering of custom grids by writing as little code as possible.
Building business logic requires us to create many PHP classes. In Magento, they already encapsulate a lot of information through method return types, PHPDoc type hints and EAV attribute metadata.
Having to write lots more code to create supplemental admin grids is frustrating, when all that information already exists in the system. Why not reuse that to render grids?
That is what Hyvä Admin does. It provides sensible defaults and allows you to configure the rest when needed.
Current state of affairs
The Hyvä Admin Grid API is stable and used in production. In the near future, the styling will change a bit to make the grids look similar to the default grids. New features are added in a backward compatible manner.
In the future, Hyvä Admin will also support form generation, though this is a work in progress. The current state of forms support is tracked in a GitHub issue.
How do I create a grid with Hyvä Admin?
In a (very small) nutshell: Install Hyva_Admin and configure your desired grid in your module. But, here’s a bit more detail:
Installation
First, the hyva-themes/module-magento2-admin module needs to be installed as a dependency with composer.
"require": {
    	...
    	"hyva-themes/module-magento2-admin": "~1.1.0"
	},
At the time of writing, the current release is 1.1.16.
Creating a grid
Over the course of this article, we will build an example to demonstrate how to create a grid and specify column data types. Showing a basic grid only needs five lines of XML.
If you are not satisfied by the basic functionality, there are many additional features that can be configured. But, many of those additional features are out of scope for this introductory article. Once you’ve worked through this text, I'm hopeful you will be able to figure out anything else you need by using the existing documentation.
Example Source Code
You can find the example module source code from this article on GitHub.
Prerequisites
Every Hyvä Admin grid is rendered on a page in the Magento backend. Before we start to build a grid, we need a place for the code. Which brings us to the prerequisites. This article assumes you know Magento Backend Development. More specifically, for a Hyvä Admin grid, you will need:
- A Magento module for our grid (in this example, Hyva_AdminIntro)
- An admin route in etc/adminhtml/routes.xml
- An admin action controller returning a Page result (I'll use Controller/Adminhtml/Index/Index.php)
- A layout XML file for the route served by the action controller (for this example, view/adminhtml/layout/hyva_admin_intro_index_index.xml)
All of the above are standard Magento boilerplate; creating them is not covered by this article. There are dozens of resources on the web to show you how to build them. There also are many module-scaffolding tools that can do this.
Once you have each of the four items ready, you can begin building the grid.
To show a grid, you’ll need to do two things:
- Declare the grid block in layout XML.
- Specify the grid contents in a grid XML definition.
The order in which you do those two things does not matter, since one doesn't work without the other.
Declare the grid block
Personally, I like to start by declaring the grid block. Hyvä Grids are regular Magento blocks.
When adding the layout XML, three things are of importance:
1. The block class must be Hyva\Admin\Block\Adminhtml\HyvaGrid. We take care of this by specifying this as the block class attribute:
<block class="Hyva\Admin\Block\Adminhtml\HyvaGrid"/>
2. The grid XML file to use. There are two ways to specify the grid XML file to use. The most common way is to specify the grid file name as the block name:
<block class="..." name="demo-grid"/>
(If you want to know the other way: look it up in the documentation.) Usually the block is added to the content, so it will be rendered automatically on the page.
<referenceContainer name="content">
  <block .../>
</referenceContainer>
3. Load the Tailwind CSS styles and Alpine.js library. To do this, include the hyva_admin_grid layout handle:
<update handle="hyva_admin_grid"/>
These styles do not reset any existing ones — the Tailwind CSS classes are loaded in addition to the regular Magento admin CSS styles.
Here is the complete layout XML file for the example:
<page xmlns:xsi="http://www.w3.org/2001/XMLSchema-instance"
  	xsi:noNamespaceSchemaLocation="urn:magento:framework:View/Layout/etc/page_configuration.xsd">
	<update handle="hyva_admin_grid"/>
	<body>
    	<referenceContainer name="content">
        	<block class="Hyva\Admin\Block\Adminhtml\HyvaGrid" name="demo-grid"/>
    	</referenceContainer>
	</body>
</page>
Declare the grid configuration
Grid XML declarations reside in a module directory view/adminhtml/hyva-grid.
The file name corresponds to the name of the grid block in layout XML.
In the example module the block is called demo-grid, so the name for the grid configuration file is
view/adminhtml/hyva-grid/demo-grid.xml
Like most other XML configuration files in Magento, when a grid configuration is loaded, all grid XML files with the same name will be merged together. The combined XML then defines the structure of the grid.
The demo grid configuration will be the merged result of all view/adminhtml/hyva-grid/demo-grid.xml files from all active modules.
So, what does a grid XML file look like?
We start with the boilerplate root node:
<?xml version="1.0"?>
<grid xmlns:xsi="http://www.w3.org/2001/XMLSchema-instance"
  	xsi:noNamespaceSchemaLocation="urn:magento:module:Hyva_Admin:etc/hyva-grid.xsd">

</grid>
Note: If you configure your PHPStorm or VSCode to resolve the XSD file, it will be able to provide you with helpful suggestions and validation. (I don't want to work without it!)
There is only one piece of information that is required to get a grid: the grid source.
There are four different grid source types at our disposal:
- Repository getList method
- DB Collection
- PHP Array
- SQL query
A grid always uses exactly one of these source types. Each grid source type has its benefits and downsides.
Let us build the example grid with each of these four source types and compare the advantages and drawbacks of each.
The example grid
Because it is readily available in every Magento instance, this article will use the built-in CMS block type for the example grid. For real work, I almost never have to build grids for existing types, but it will serve well as an example scenario.
Feel free to try out different entity types from a project you are working on and get a feel for how much work it is to render nicely.
First up: the ‘Repository getList’ Grid Source Type
This source type has an awkward name, "Repository getList"; however, that is exactly how the type is specified:
<?xml version="1.0"?>
<grid xmlns:xsi="http://www.w3.org/2001/XMLSchema-instance"
  	xsi:noNamespaceSchemaLocation="urn:magento:module:Hyva_Admin:etc/hyva-grid.xsd">
	<source>
    	<repositoryListMethod>\Magento\Cms\Api\BlockRepositoryInterface::getList</repositoryListMethod>
	</source>
</grid>
Actually, the name of the method doesn't matter. It could be called gnubPedestalFoobar, or whatever. What matters is the method signature:
- It takes a \Magento\Framework\Api\SearchCriteriaInterface instance as an argument.
- It returns an instance of \Magento\Framework\Api\SearchResultsInterface.
- The actual items to display in the grid are then taken from the result getItems instance.
One of the nice things about repositories is that they usually have pretty explicit PHPDoc type hints. Hyvä Admin Grid uses that information to guess which fields are available as columns, and how to render them as HTML.
Any extension attributes, and — for entity-attribute-value (EAV) entities — custom attributes are also included as grid columns.
This is what the result of the above configuration looks like:
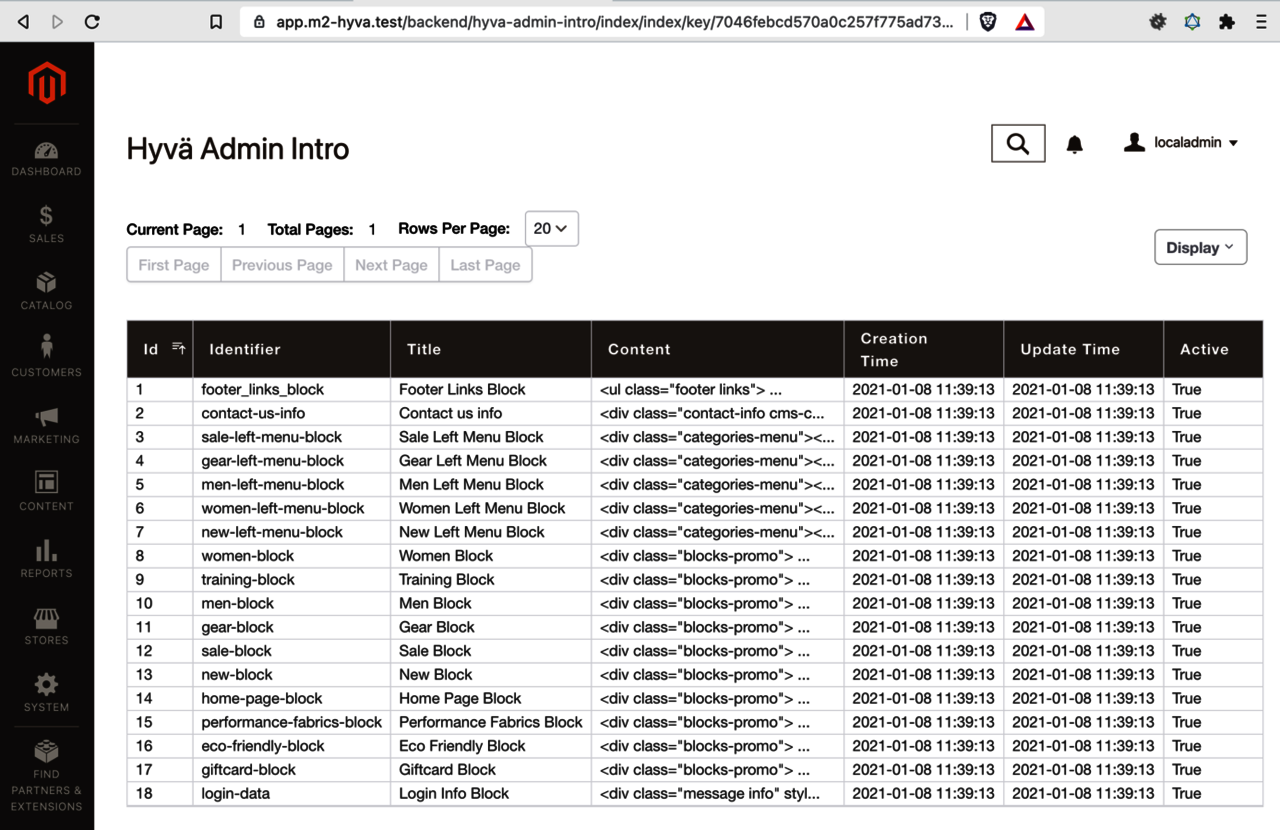
Figure 1 – A minimal CMS block grid with a repository grid source type
If we compare that to the built-in CMS blocks grid, we can see that they are not quite the same:
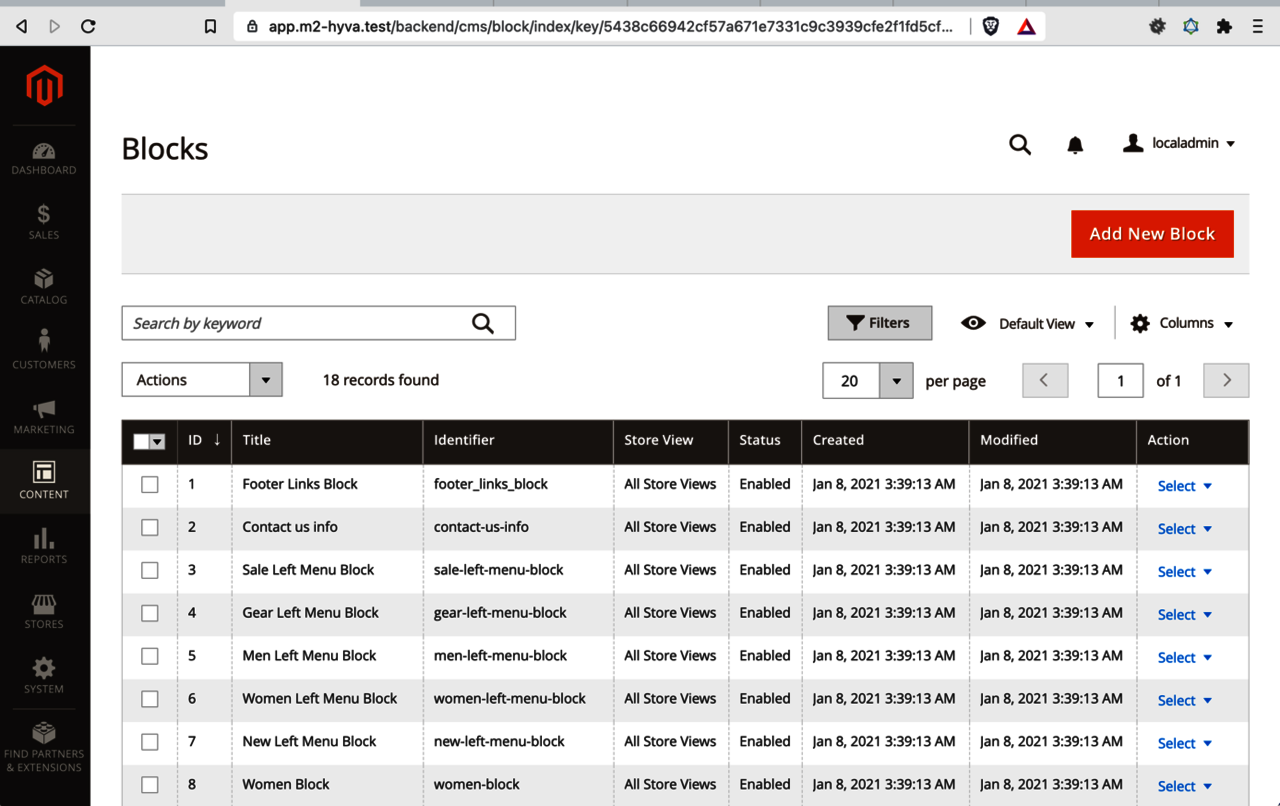
Figure 2 – The original built in CMS block grid
The most important differences are:
- The "Content" column is present in the Hyvä grid, but missing in the original grid.
- The "Store Views" column is present in the original grid, but missing in the Hyvä grid.
- The Datetime columns look rather raw in the Hyvä grid, even though they are readable.
- The "Active" column in the Hyvä grid is probably the same as the "Status" column in the original grid. Also, the cells contain "True" instead of "Enabled".
- The "Action" column is missing in the Hyvä grid.
Let's briefly have a look at these differences, one after the other, and see if and how we can improve them.
The Content column
This column is present because the CMS Block interface has a method \Magento\Cms\Api\Data\BlockInterface::getContent(). There are different ways to remove it, but the simplest is to add the following configuration to our grid XML file:
<columns>
    	<exclude>
        	<column name="content"/>
    	</exclude>
	</columns>
We will see another way further down.
The ‘Store Views’ column
This column is missing because the returned type \Magento\Cms\Api\Data\BlockInterface has no such “get” method. To add a column to custom repositories where you "own" the code, all that is needed is a new get method.
The best way to add a column to a grid with a repository source type where you don't "own" the code is to declare it as an extension attribute. Sadly, this is quite a lot of work and out of scope for this article. It is usually quicker to add a column to one of the other grid source types.
The formatting of the ‘Creation Time’ and ‘Update Time’ columns
To change the formatting we need to configure the column type.
<columns>
    	<include keepAllSourceColumns="true">
        	<column name="creation_time" type="datetime"/>
        	<column name="update_time" type="datetime"/>
    	</include>
    	<exclude>
        	<column name="content"/>
    	</exclude>
	</columns>
This fixes the formatting, but it sadly also messes up the column sorting:
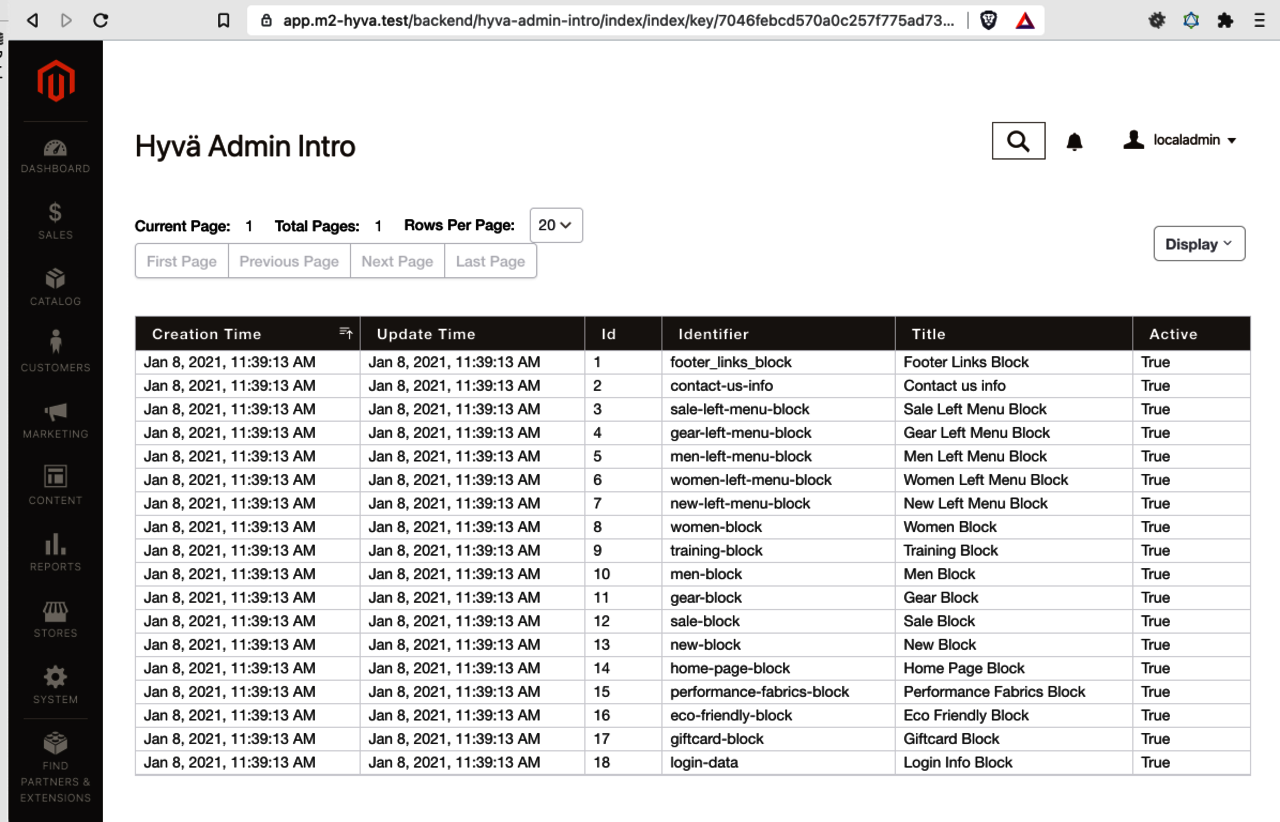
Figure 3 – Repository Grid with datetime columns in the leftmost postitions
The logic behind this behavior is: If a column is referenced in the configuration, it is considered more important than columns without configuration.
Important columns should be displayed first. Columns are displayed in the order they are configured. Beyond that, the sort order of columns can also be specified with a sortOrder attribute. Please note that the keepAllSourceColumns="true" attribute in the code snippet above is, by default, false and only the columns configured in the <include> node are shown. When it is set to true, all available columns are rendered, even if only some of them are configured in the grid XML.
To really fix the grid column sort order, you need to add all the columns that you wish to render to the include section.
If you set keepAllSourceColumns to false (or remove the attribute), you can then also remove the exclude configuration.
<columns>
    	<include>
        	<column name="id"/>
        	<column name="identifier"/>
        	<column name="active"/>
        	<column name="creation_time" type="datetime"/>
        	<column name="update_time" type="datetime"/>
    	</include>
	</columns>
This is a rather typical grid to include column configuration. Now the column sort order is correct, and the datetime formatting is also as desired.
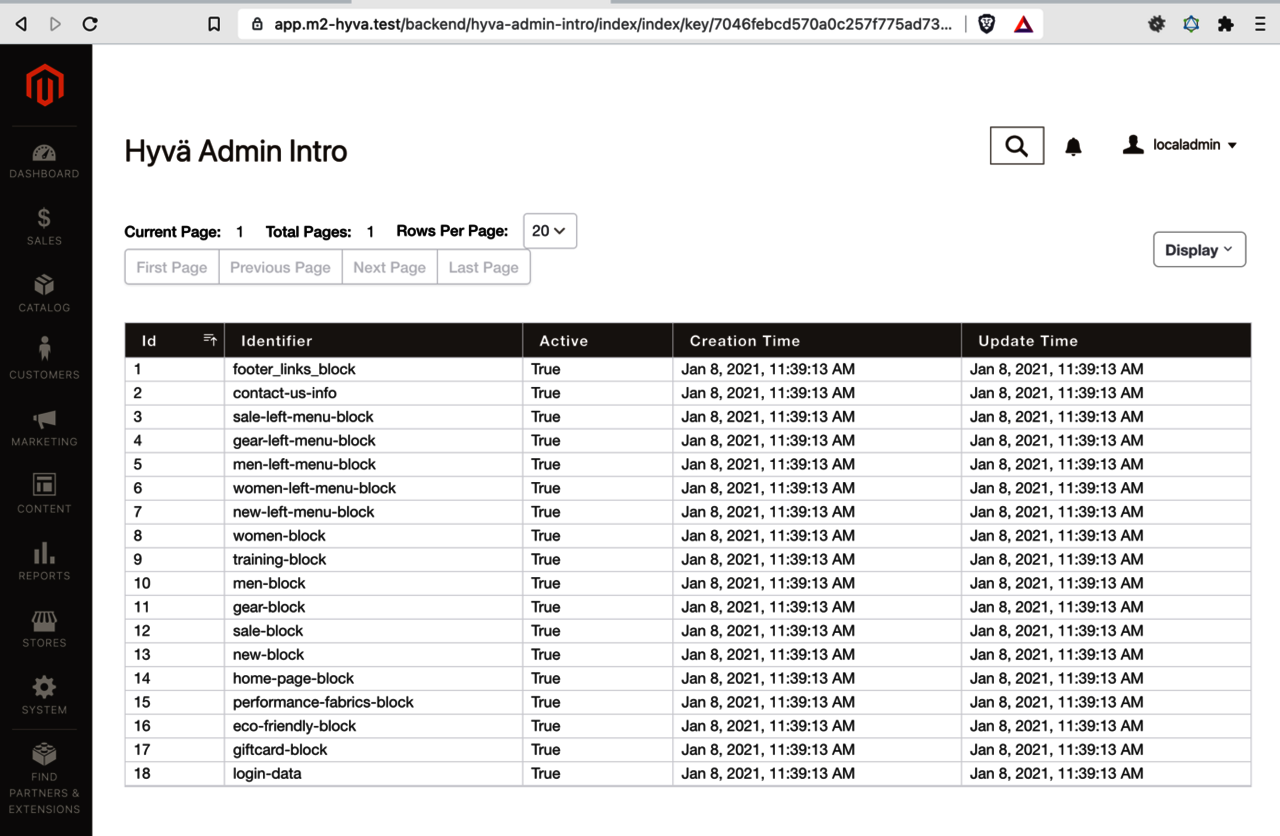
Figure 4 – Repository Grid with correct datetime formatting and correct sort order for columns
The ‘Active’ column
First, the column label.
The column name is determined from the column code. In this example column, the value is derived from the method isActive. The method name after the prefix is is used as the column "key". The same is done for methods starting with has or get, too.
So any method isActive, hasActive or getActive would be rendered as a column with the key active.
To change the label all that is required is to add the attribute label="Status".
<column name="active" label="Status"/>
Now, what about the column content? Why is it being rendered as "True" instead of "Enabled"? The Active column values are treated as booleans because of the PHPDoc type hint for the method BlockInterface::isActive.
/**
 * Is active
 *
 * @return bool|null
 */
public function isActive();
By default, boolean values are rendered as True or False. We can change that by adding options to the column configuration:
<column name="active" label="Status">
    	<option value="0" label="Disabled"/>
    	<option value="1" label="Enabled"/>
	</column>
Alternatively, it is also possible to declare a source model on the column, but, unless a matching source model already exists, it is usually easier to hardcode them in the XML. For this example’s sake, here is how the configuration for a source model would look:
<column name="active" label="Status"
    	source="\Hyva\AdminIntro\Model\Entity\Attribut\Source\StatusSource"/>
In either case, the Status column now is rendered as intended.
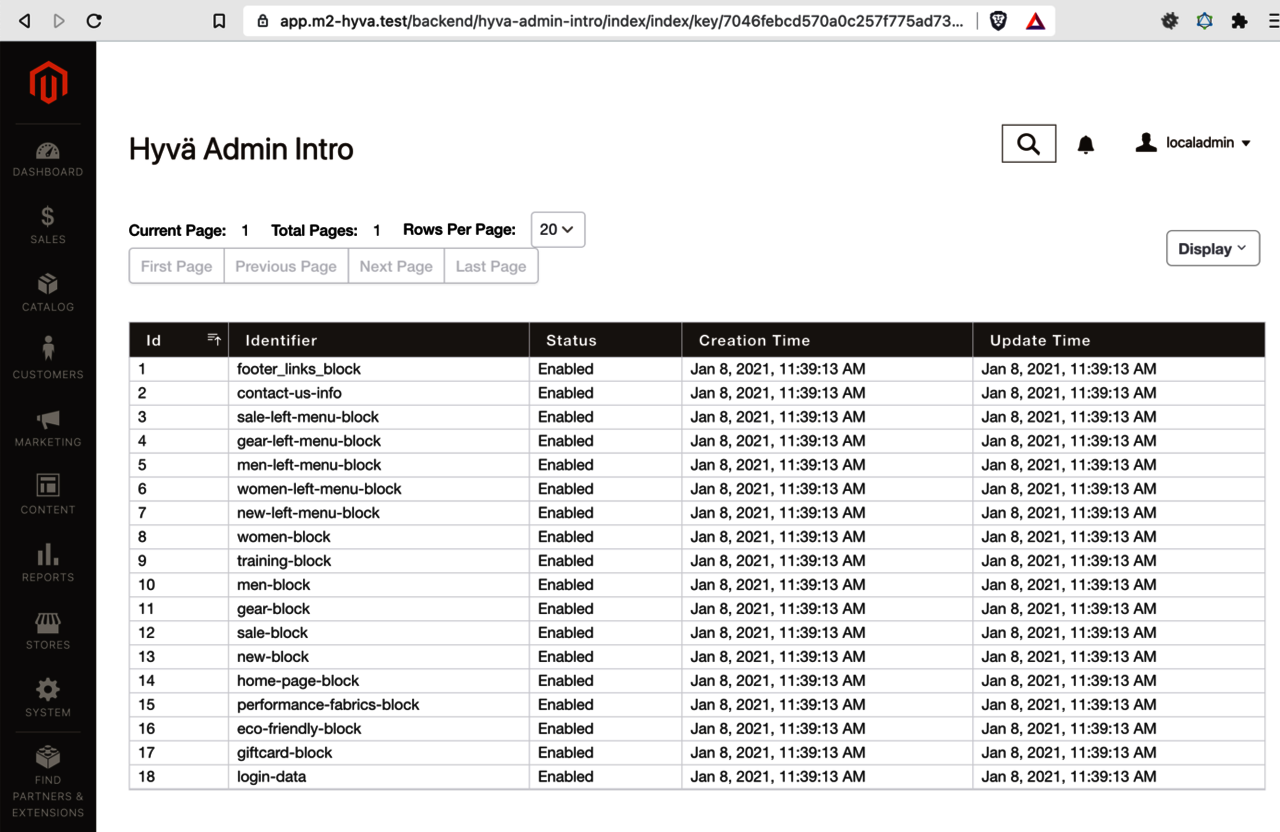
Figure 5 – Repository Grid with correct status column formatting
The ’Action’ column
The action column is special. Grid Actions are not determined from the fields on the grid source, but always need to be configured. A new <actions> node is required on the same level as <source> and <columns>:
<actions idColumn="id">
    	<action id="edit" label="Edit" url="cms/block/edit" idParam="block_id"/>
	</actions>
The original grid has multiple actions that are rendered as a dropdown. At the time of this writing, Hyvä Admin Grids render multiple actions as individual links, so they look a bit different.
There are quite a lot of options that influence how actions work. Please refer to the API documentation for more details.
Pros and Cons of the ‘Repository getList’ Grid Source Type
Repositories are quite common, so they are often a good first choice for grids if one exists. Another nice thing about this source type is that regular Magento extension attributes work directly with Hyvä Admin grids.
On the downside, because the actual loading is considered an implementation detail of repositories, it is not simple to tune performance of grids with this source type. That said, up to 1 million records in a flat table, with strategically placed DB indexes, have worked very well for me so far.
The Collection Grid Source Type
Instead of using the repository getList method as a grid source, you can also use DB collections. Most, if not all, Magento repositories use models and collections under the hood to access the values from the database. So, in a way, using a collection as the grid source is like going one level deeper into the implementation details.
To configure a collection grid source type, specify the collection class name:
<?xml version="1.0"?>
<grid xmlns:xsi="http://www.w3.org/2001/XMLSchema-instance"
  	xsi:noNamespaceSchemaLocation="urn:magento:module:Hyva_Admin:etc/hyva-grid.xsd">
	<source>
    	<collection>\Magento\Cms\Model\ResourceModel\Block\Collection</collection>
	</source>
</grid>
This already is enough to populate the grid, but — out of the box — there is too much information:
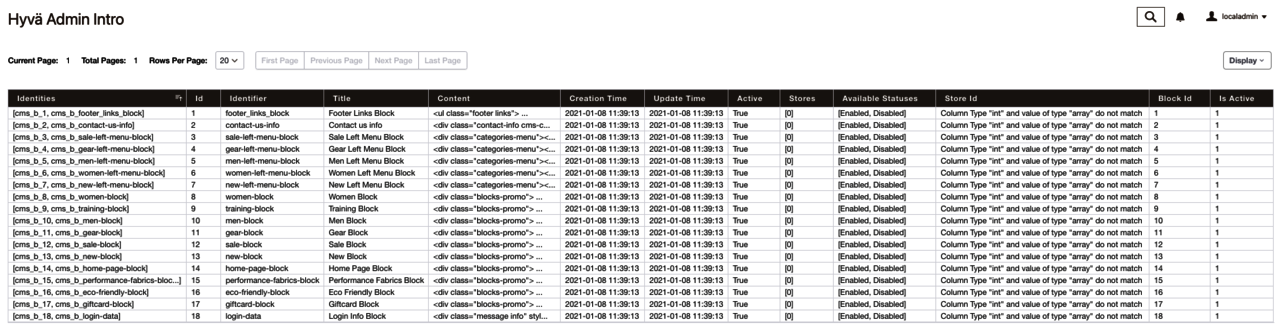
Figure 6 – CMS Block Collection Grid with many columns
The default columns are the combination of the fields on the underlying \Magento\Framework\DB\Select instance, “get” methods on the collection model and — for EAV entities — any custom attributes.
Looking at the result shown in the screenshot above, there are some things I would like to point out:
Array values
Some columns contain array values. For example, the "Identities" column (in case you are wondering: these are the cache tags for the records). Out-of-the-box arrays are rendered like: [cms_b_1, cms_b_footer_links_block]. This could be changed with a custom column template, or a custom data type. For now, we will leave this as it is, though I did want to point this out.
The ‘Store Id’ column displays an error message
Every row in the "Store Id" column contains the message:
Column Type "int" and value of type "array" do not match
What is going on here? The issue is that the PHPDoc return type hint for the method getStoreId is not accurate. The type hint says the method will return an integer, but, in fact, it returns an array.
/**
 * @method Block setStoreId(int $storeId)
 * @method int getStoreId()
 */
class Block extends AbstractModel implements BlockInterface, IdentityInterface
To fix this, we need to override the automatic type determination by configuring a type on the column. This is an underlying principle of Hyva_Admin: Try to use a sensible default, but allow it to be overridden in configuration.
Hyvä Admin has a built-in type store_id to make arrays with store IDs look pretty, since those are used a lot in Magento.
<column name="store_id" type="store_id"/>
The store_id column type renders an individual store ID or an array of store IDs in a human-readable fashion.
Let us also take the opportunity to only show the columns we are interested in.
<columns>
    	<include>
        	<column name="id"/>
        	<column name="identifier"/>
        	<column name="store_id" type="store_id"/>
        	<column name="is_active" label="Status">
            	<option value="0" label="Disabled"/>
            	<option value="1" label="Enabled"/>
        	</column>
        	<column name="creation_time" type="datetime"/>
        	<column name="update_time" type="datetime"/>
    	</include>
	</columns>
If you want to dig deeper into Hyvä Grid data types, have a look at the API documentation, the module directory Model/DataType, and the etc/di.xml configuration for the type Hyva\Admin\Model\DataType\DataTypeFacade.
Choosing the right collection class
Often there is more than one collection class for an entity. CMS Blocks, for example, have these collection types:
- \Magento\Cms\Model\ResourceModel\Block\Collection
- \Magento\Cms\Model\ResourceModel\Block\Grid\Collection
Either works well as long as it returns the desired column data. The "Grid" collections tend to be a bit more performant as they use dedicated "index" tables that contain a subset of the regular collection data for more speedier admin grids.
Pros and Cons of the Collection Grid Source Type
One of the upsides of collection providers is that they are relatively efficient.
Also, in Magento, almost any information in the database is accessible through some collection. Another nice thing about grids with a collection source type is that it is rather straightforward to add new, custom columns by modifying the collection select instance (please refer to the documentation for more information).
On the downside, collections often provide more columns than needed, as we saw in the example above. All in all, collections are probably a more useful grid source type than repositories.
The Array Grid Source Type
Not all data is stored in the Database. Some data is not represented by model, collections or repositories. For example, rows in logfiles, deserialized json reports, hardcoded cache types, or, perhaps, files in the file system — all are candidates for grids but don't live in the database. Having to create full ORM representations only to render a grid feels like busy work. In cases like these, a grid with an Array Source Type is the way to go. You do need to write a PHP class to provide the array, but it is has a very small interface and is usually implemented quickly:
/**
 * Implement this interface and specify that class as an array source type for a hyva grid.
 * Return an array with one sub-array for each row of the grid.
 */
interface HyvaGridArrayProviderInterface
{
	/**
 	* @return array[]
 	*/
	public function getHyvaGridData(): array;
}
Any class implementing this interface can be used to populate a grid.
Paging, sorting and filtering are applied to the returned array. This means the provider always returns the complete array, which could be a lot of data. This is different from collection and repository source types, where filtering and paging is applied before the data is returned. For array source type providers the limit of the array size depends on the PHP configuration and the machine specs.
The following example array provider loads all CMS blocks and converts them into plain PHP arrays. This is not something that makes a lot of sense from a business perspective, but it works for an educational example.
<?php declare(strict_types=1);

namespace Hyva\AdminIntro\Model;

use Hyva\Admin\Api\HyvaGridArrayProviderInterface;
use Magento\Cms\Model\ResourceModel\Block\CollectionFactory as CmsBlockCollectionFactory;

class CmsBlockArrayProvider implements HyvaGridArrayProviderInterface
{
	private $cmsBlockCollectionFactory;

	public function __construct(CmsBlockCollectionFactory $cmsBlockCollectionFactory)
	{
    	$this->cmsBlockCollectionFactory = $cmsBlockCollectionFactory;
	}

	public function getHyvaGridData(): array
	{
    	$collection = $this->cmsBlockCollectionFactory->create();
    	return $collection->walk('getData');
	}
}
Every item in the returned array will be rendered as a row in the grid.
The most basic grid configuration for an array source type looks like this:
<?xml version="1.0"?>
<grid xmlns:xsi="http://www.w3.org/2001/XMLSchema-instance"
  	xsi:noNamespaceSchemaLocation="urn:magento:module:Hyva_Admin:etc/hyva-grid.xsd">
	<source>
    	<arrayProvider>\Hyva\AdminIntro\Model\CmsBlockArrayProvider</arrayProvider>
	</source>
</grid>
This again is enough to render a basic grid:
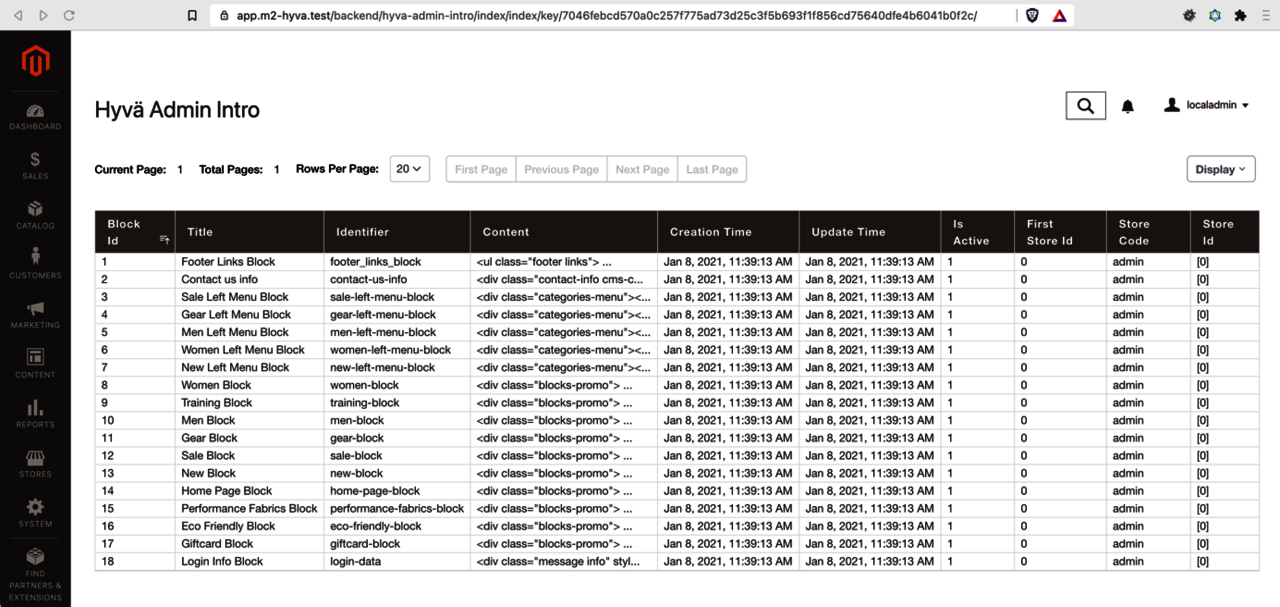
Figure 7 – CMS Block grid from an Array grid source type
The columns are determined by inspecting the array keys of the first record of the nested array returned by the array provider.
Pros and Cons of the Array Grid Source Type
The advantage of the array grid source type is that it's very flexible and simple to implement.
Adding columns can be done by configuring a plugin with an afterGetHyvaGridData method on the array provider.
The downside is that array providers can become sluggish if there is a large amount of data, and that it is not easy to tune the performance.
The Query Grid Source Type
The query grid source type requires no PHP class at all. Instead, the SQL query is configured in the grid XML file, and the returned rows are displayed directly in the grid.
<?xml version="1.0"?>
<grid xmlns:xsi="http://www.w3.org/2001/XMLSchema-instance"
  	xsi:noNamespaceSchemaLocation="urn:magento:module:Hyva_Admin:etc/hyva-grid.xsd">
	<source>
    	<query>
        	<select>
            	<from table="cms_block" as="main_table"/>
            	<columns>
                	<column name="block_id" as="id"/>
                	<column name="identifier"/>
                	<column name="title"/>
                	<column name="is_active" as="status"/>
                	<column name="creation_time" as="created"/>
                	<column name="update_time" as="updated"/>
            	</columns>
            	<join table="cms_block_store" as="t_store">
                	<on>main_table.block_id=t_store.block_id</on>
                	<columns>
                    	<expression as="store_view">GROUP_CONCAT(t_store.store_id SEPARATOR ',')</expression>
                	</columns>
            	</join>
            	<groupBy>
                	<column name="main_table.block_id"/>
            	</groupBy>
        	</select>
    	</query>
	</source>
</grid>
It is possible to select SQL expressions, join tables and union selects. Like for the collections source type, the query grid columns are determined by the select fields of the select instance.
Grids with a Query Source Type are very useful for exportable reports in the admin grid.
Pros and Cons of the Query Source Type
The query source type tends to be the fastest, so it is well-suited when working with larger amounts of data. It is also possible to tune performance by optimizing the SQL query.
Another benefit is that it is simple to add custom columns through configuration XML merging only — no PHP is required. The downside is that the query configuration depends on the underlying storage schema. If the table structure changes, the grid definition will have to be adjusted, too.
Finally, declaring a query requires some familiarity with SQL. On the other hand, depending on the developers set of skills, that could also be counted as a benefit.
Further Information
Please check out GitHub.com/hyva-themes/magento2-hyva-admin for further information. The complete documentation can be found in the doc/ subdirectory in the repository.
In the future, there will be a dedicated documentation website, too. The Grids API is fully documented. Should you encounter any issues, please open an issue on the repository. For questions, please ping me on Twitter.
If you develop interesting modules using Hyvä Admin Grids, please let me know. And finally, have fun making grids!

