How to Create a Custom Log File in Magento 2

In Magento 1.x versions, it was easier to log data into custom log files using the Mage::log() function. To save the logs into a custom file, you just had to change the $file parameter of log() function. But, for Magento 2.x versions this is not as straightforward, since it uses Monolog, a popular PHP logging solution, to log data. However, Magento 2.x provides three types of default log files: debug.log, exception.log and system.log. Even though we still can use these files to log data, sometimes we need to have our own custom log files. If you have ever wondered how to create a custom log file in Magento 2.x, then this is for you.
Create a basic Magento 2 module
We will create a basic module to demonstrate the logs. This step can be skipped if you already have a module that can be used to create our custom logger.
First, create module.xml and registration.php files in order to introduce the new module to the Magento codebase. We will use Example as the namespace and Customlog as the module name.
File: Example\Customlog\registration.php
<?php
\Magento\Framework\Component\ComponentRegistrar::register(
\Magento\Framework\Component\ComponentRegistrar::MODULE,
'Example_Customlog',
__DIR__
);File: Example\Customlog\etc\module.xml
<?xml version="1.0"?>
<config xmlns:xsi="http://www.w3.org/2001/XMLSchema-instance"
xsi:noNamespaceSchemaLocation="urn:magento:framework:Module/etc/module.xsd">
<module name="Example_Customlog">
<sequence>
<module name="Magento_Catalog"/>
</sequence>
</module>
</config>
Second, for testing purposes, create a frontend router so that the module can use a controller class to execute the custom logger.
File: Example\Customlog\etc\frontend\routes.xml
<?xml version="1.0"?>
<config xmlns:xsi="http://www.w3.org/2001/XMLSchema-instance"
xsi:noNamespaceSchemaLocation="urn:magento:framework:App/etc/routes.xsd">
<router id="standard">
<route id="example" frontName="customlog">
<module name="Example_Customlog"/>
</route>
</router>
</config>
Create the logger
Now, you are ready to create the logger and handler classes.
The below handler class defines the custom log file along with its relative path, starting from the Magento root directory. According to the below code, your custom log file will be generated in {MagentoRoot}/var/log/mycustom.log.
File: Example\Customlog\Logger\Handler.php
<?php
namespace Example\Customlog\Logger;use Magento\Framework\Logger\Handler\Base as BaseHandler;
use Monolog\Logger;class Handler extends BaseHandler
{
/**
* Logging level
* @var int
*/
protected $loggerType = Logger::WARNING;/**
* File name
* @var string
*/
protected $fileName = '/var/log/mycustom.log';
}
Logger levels
Above, I define the $loggerType, which is the applicable level of logging in the custom logger. If you check the file Monolog/Logger.php, you will see the below log type constants defined there.
Constant | Severity | Description |
DEBUG | 100 | Detailed debug information |
INFO | 200 | Interesting events |
NOTICE | 250 | Uncommon events |
WARNING | 300 | Exceptional occurrences that are not errors |
ERROR | 400 | Runtime errors |
CRITICAL | 500 | Critical conditions |
ALERT | 550 | Action must be taken immediately |
EMERGENCY | 600 | Urgent alert |
When you set the $logType for your custom logger, it is better to know how the logging type severity fallback works. For example, if you set WARNING as the $logType, then the custom logger can only access the levels including WARNING and above, such as ERROR, CRITICAL, ALERT and EMERGENCY. It cannot access the NOTICE, INFO or DEBUG, which are low levels compared to WARNING.
Define the logger
Next, you need to define the custom logger handler information in your di.xml file. The handler Example\Customlog\Logger\Handler.php will handle your logger class, which is Example\Customlog\Logger\Logger.php. Moreover, in this file you can give a unique name to the handler. In my example case, it is set to “myCustomLogger”.
File: Example\Customlog\etc\di.xml
<?xml version="1.0"?>
<config xmlns:xsi="http://www.w3.org/2001/XMLSchema-instance"xsi:noNamespaceSchemaLocation="../../../../../lib/internal/Magento/Framework/ObjectManager/etc/config.xsd">
<type name="Example\Customlog\Logger\Handler">
<arguments>
<argument name="filesystem" xsi:type="object">Magento\Framework\Filesystem\Driver\File</argument>
</arguments>
</type>
<virtualType name="Example\Customlog\Logger\Logger" type=”Monolog\Logger”>
<arguments>
<argument name="name" xsi:type="string">myCustomLogger</argument>
<argument name="handlers" xsi:type="array">
<item name="system" xsi:type="object">Example\Customlog\Logger\Handler</item>
</argument>
</arguments>
</virtualType>
<type name=”Example\Customlog\Controller\Index\Index”>
<arguments>
<argument name=”logger” xsi:type=”object”>Example\Customlog\Logger\Logger </argument>
</arguments>
</type>
</config>
Test the logger
At last, you have created your custom logger and it’s time to test it. To do this, create a basic controller class, which will use your custom logger to log data.
File: Example\Customlog\Controller\Index\Index.php
<?php
namespace Example\Customlog\Controller\Index;use \Psr\Log\LoggerInterface;
use Magento\Framework\App\Action\Action;
use Magento\Framework\App\Action\Context;
use Magento\Framework\Controller\Result\JsonFactory;
use Magento\Framework\View\Result\PageFactory;class Index extends Action
{
/**
* @var PageFactory
*/
protected $resultPageFactory;/**
* @var JsonFactory
*/
protected $resultJsonFactory;/**
* @var LoggerInterface
*/
protected $logger;public function __construct(
Context $context,
PageFactory $resultPageFactory,
JsonFactory $resultJsonFactory,
LoggerInterface $logger
) {
$this->resultPageFactory = $resultPageFactory;
$this->resultJsonFactory = $resultJsonFactory;
$this->logger = $logger;
parent::__construct($context);
}public function execute()
{
// Our logger would not allow to use debug,info and notice log types
$this->logger->debug('Log Debug');
$this->logger->info('Log Info');
$this->logger->notice('Log Notice');// We can use below log types via our custom log
$this->logger->warning('Log Warning');
$this->logger->error('Log Error');
$this->logger->critical('Log Critical');
$this->logger->alert('Log Alert');
$this->logger->emergency('Log Emergency');$result = $this->resultJsonFactory->create();
$data = ['message' => 'Hello world!'];return $result->setData($data);
}
}
Reminders
Do not forget to run the below commands once you are done with the coding and ensure the newly created module is active.
bin/magento setup:upgrade
bin/magento cache:flush
From the browser, redirect to the below URL, which will execute the above created controller.
{YourBaseURL}/customlog/index/index
The browser will display the below data.
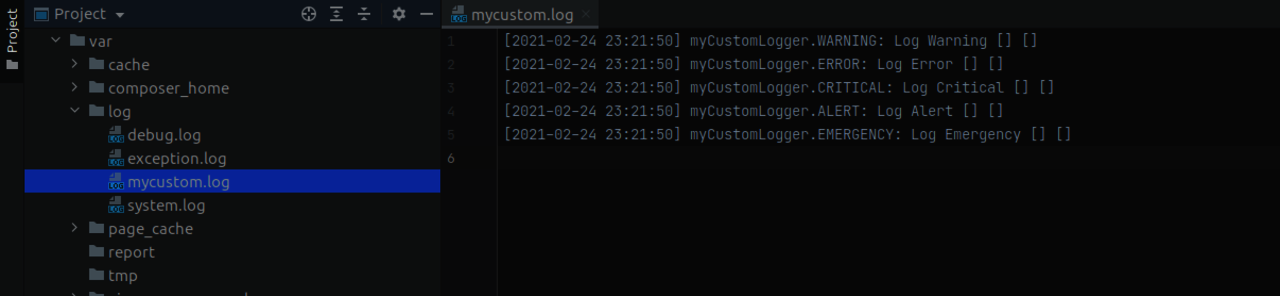
Now, if you go to the {MagentoRoot}/var/log directory, you can see your custom log file mycustom.log has been generated. The logs will show similar to the example below.
Congratulations! You just created a custom logger in Magento 2.x. I hope this will help you to organize your custom Magento logs in a more meaningful manner.